
In This Article
A 3-in-1 jacket for hiking is a two-piece outerwear system — a waterproof outer shell zipped to a removable insulating liner — that lets you wear either piece alone or both together, adapting to shoulder-season drizzle, alpine wind, or a hard winter freeze without buying three separate coats. If you have ever stood at a trailhead in October, sweating in a parka that was built for January, you already understand the appeal. Canadian weather does not read the calendar, and neither should your outerwear.
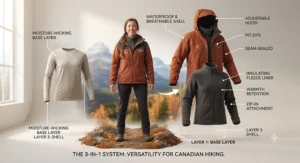
Here is the thing nobody tells you at the outdoor store: most hikers do not actually need seven jackets in a closet rotation. They need one smart system that flexes. That is the entire premise behind a 3-in-1 jacket for hiking, and it is why the category has quietly become one of the most searched pieces of outdoor gear in Canada every fall. Parks Canada’s own winter hiking safety guidance leans hard on the same idea — layer up, layer down, and always keep your outer shell wind- and waterproof — which is essentially the operating manual for this entire product category.
This guide digs into seven real, currently available options spanning budget knockabouts to genuine alpine-grade builds, breaks down what the spec sheets actually mean for your knees and your core temperature, and walks through how to buy one that will not end up as a garage-sale casualty by March. We will cover the men’s 3-in-1 jacket landscape specifically, since fit, cut, and insulation weight differ meaningfully from women’s and unisex builds, and we will get honest about where these jackets shine and where a dedicated shell still wins.
Quick Comparison Table
| Jacket | Waterproof Rating | Insulation | Best For |
|---|---|---|---|
| Columbia Whirlibird IV Interchange | Omni-Tech (seam-sealed) | Thermarator + Omni-Heat | Deep-winter day hikes |
| The North Face Antora Triclimate | DryVent 2L | 300 g/m² recycled fleece | All-season versatility |
| Marmot Ramble Component | 10,000mm NanoPro | Thermal R fleece | Serious hiking use |
| Helly Hansen Squamish CIS | Helly Tech Protection | PrimaLoft Black | Coastal, wet-heavy climates |
| Columbia Bugaboo II Interchange | Omni-Tech (seam-sealed) | 80g Slimtech + Omni-Heat | Budget-conscious warmth |
| CAMEL CROWN 3-in-1 | 10,000mm/H2O | Fleece liner | Tight-budget starters |
| Wantdo Mountain 3-in-1 | 10,000mm PU membrane | Thermal fleece | Backup or loaner jacket |
Looking at the spread above, the Marmot Ramble Component and Helly Hansen Squamish CIS sit at the technical end of the category, built by brands whose whole business is mountain performance rather than mall fashion. The Columbia Bugaboo II Interchange and CAMEL CROWN 3-in-1 anchor the value end, trading a bit of long-term durability for a price point that will not make you wince. Everyone else in the middle, including the North Face Antora Triclimate, is chasing that sweet spot where a single jacket genuinely replaces three.
💬 Just one click — help other Canadian shoppers make better buying decisions too!😊
Top 7 3-in-1 Jackets for Hiking: Expert Analysis
1. Columbia Whirlibird IV Interchange — best all-rounder for cold, wet trail days
The Columbia Whirlibird IV Interchange built its reputation on ski hills, but its actual construction makes it just as capable on a snowy trailhead. The outer shell is critically seam-sealed Omni-Tech fabric, a nylon-polyester Legacy Dobby weave that Columbia has refined over two decades of interchange jackets, so this is not a first-generation experiment. On paper, that seam-sealing matters more than most buyers realize: an unsealed shell can technically use waterproof fabric and still leak at every stitch line, which is exactly where most budget rain gear fails first. The liner pairs Thermarator synthetic fill with Omni-Heat’s reflective dot lining, a combination reviewers consistently single out as noticeably warmer than its weight would suggest. Who should care: anyone doing cold-weather day hikes where temperatures swing from above freezing at the trailhead to well below it at elevation, since the zip-together system covers that entire range without a wardrobe change. Aggregated review sentiment across major retailers points to strong satisfaction with warmth and weatherproofing, with the most repeated critique being a boxier cut than some hikers prefer for scrambling.
Pros:
- ✅ Seam-sealed Omni-Tech shell blocks wet-snow soak-through reliably
- ✅ Omni-Heat reflective liner adds warmth without excess bulk
- ✅ Removable, adjustable storm hood handles wind-driven precipitation
Cons:
- ❌ Boxier fit limits mobility on technical scrambles
- ❌ Heavier overall system than dedicated 3-season shells
The Columbia Whirlibird IV Interchange typically lands in the C$220-C$320 range depending on colourway and retailer promotions, and at that price it is hard to argue with the warmth-per-dollar on offer — check current price before you commit, since Columbia’s pricing moves around often.

2. The North Face Antora Triclimate — best balance of warmth and everyday versatility
The North Face Antora Triclimate is the jacket most likely to actually leave the closet on a random Tuesday, and that versatility is the whole point of buying a 3-in-1 system in the first place. The outer shell is a 70D x 70D DryVent 2L construction at 109 g/m², built from recycled nylon ripstop with a non-PFC DWR finish, while the inner liner is a 150D x 100D recycled polyester fleece at a substantial 300 g/m². What that combination means in practice: the shell alone handles a spring downpour without feeling like a plastic bag, and the fleece alone is dense enough to function as a genuine mid-layer on its own, not just a token liner. Buyers who split time between commuting, casual trail walks, and the occasional overnight car-camping trip get the most value here, since the jacket is equally at home in a parking lot or on a fire road. Aggregated customer sentiment on this model consistently praises the fleece’s standalone warmth, with a recurring note that the DryVent shell, while genuinely waterproof, breathes less impressively than premium 3-layer alternatives during aerobic effort.
Pros:
- ✅ 300 g/m² fleece liner works as a standalone jacket, not filler
- ✅ Recycled DryVent 2L shell is fully seam-sealed and PFC-free
- ✅ Snap-in Triclimate compatibility works across other North Face pieces
Cons:
- ❌ DryVent breathability lags behind pricier 3-layer membranes
- ❌ Standard fit runs slightly long for layering under a pack’s hip belt
Expect the North Face Antora Triclimate to sit somewhere in the mid-C$200s to C$290 range at the time of research, positioning it as the mid-tier benchmark this whole category gets measured against.
3. Marmot Ramble Component — best for hikers who actually want technical performance
If you are choosing based on hard numbers rather than brand recognition, the Marmot Ramble Component deserves the top technical marks in this lineup: its NanoPro shell carries a stated 10,000mm waterproof rating, a figure that puts it comfortably ahead of the vaguer “waterproof” claims some competitors make without publishing a number. That NanoPro coating is fully seam-taped rather than just DWR-sprayed, which is the difference between a jacket that resists a light drizzle and one that can sit through an actual coastal downpour. The inner Thermal R fleece liner uses articulated elbows and an Angel Wing shoulder pattern borrowed from Marmot’s technical shell line, so reach and swing feel closer to a climbing jacket than a mall coat. Reviewers who log real trail miles in this jacket repeatedly mention the freedom of movement during scrambles and pole-planting, a detail that spec sheets rarely capture but matters enormously on uneven terrain. This is the pick for anyone whose “hiking” involves actual elevation gain rather than flat park loops.
Pros:
- ✅ Published 10,000mm waterproof rating with full seam-taping
- ✅ Articulated elbows genuinely improve range of motion on scrambles
- ✅ Recycled shell and lining fabrics without sacrificing performance
Cons:
- ❌ Premium price puts it above most casual 3-in-1 competitors
- ❌ Fixed (non-removable) hood limits packability when stowed
Expect to pay in the C$240-C$330 range for the Marmot Ramble Component, which lands it near the top of this lineup on price — a fair trade if you are logging serious trail time rather than the occasional weekend stroll.
4. Helly Hansen Squamish CIS — best for genuinely wet, coastal hiking conditions
Named after the notoriously drizzly climbing town it is built for, the Helly Hansen Squamish CIS leans into Helly Hansen’s Component Insulation System, a modular approach that treats the liner as interchangeable across the brand’s whole CIS lineup, not just this one jacket. The outer shell uses Helly Tech Protection, a fully seam-sealed 2-ply polyester construction with DWR treatment and a quick-dry lining, while the removable insulator is filled with PrimaLoft Black synthetic fill — insulation that, unlike down, keeps performing even when it gets damp, a genuinely important distinction for anyone hiking through coastal fog or wet snow. What most buyers overlook about this model is the one-hand hood adjustment, a small design detail that matters enormously when you are holding trekking poles in a downpour and cannot spare a free hand to fuss with drawcords. This jacket is squarely built for British Columbia’s Lower Mainland, Vancouver Island, and anywhere else where “waterproof” needs to mean it, not just imply it.
Pros:
- ✅ PrimaLoft Black insulation retains warmth even when damp
- ✅ One-hand hood adjustment is genuinely useful in active rain
- ✅ Component Insulation System liner cross-compatible with other CIS pieces
Cons:
- ❌ Among the pricier options here relative to insulation weight
- ❌ Fixed hood design offers less customization than adjustable-only shells
The Helly Hansen Squamish CIS generally runs in the C$280-C$360 range at full retail, though it is frequently discounted at outdoor specialty stores — always check current price, since this one moves more than most.
5. Columbia Bugaboo II Interchange — best budget pick that does not feel like a compromise
The Columbia Bugaboo II Interchange has been recommended by outdoor writers and family members alike for years, and the reason is simple: it delivers Columbia’s proven Omni-Tech and Omni-Heat technology at a price that undercuts nearly everything else with a recognizable brand name attached. The seam-sealed Omni-Tech shell handles wet-weather protection competently, while the 80g Slimtech polyester insulation in the fleece liner, backed by the reflective Omni-Heat lining, punches above its weight for warmth. Based on the spec comparison against pricier Columbia models like the Whirlibird IV, the Bugaboo II trades some premium touches — a slightly simpler pocket layout, a marginally less refined liner fabric — for genuine savings without sacrificing the core waterproof-breathable-warm formula that makes this category work. This is the jacket to hand a teenager heading off to university, a newcomer to hiking who is not ready to commit hundreds of dollars, or anyone who wants a reliable backup system. Aggregated reviews consistently rate it highly for the price bracket, with the most common critique being a slightly shorter hem than taller hikers would prefer.
Pros:
- ✅ Omni-Tech and Omni-Heat tech at a genuine budget price point
- ✅ Zip-in fleece liner works confidently as a standalone piece
- ✅ Lifetime manufacturer warranty backs a well-established design
Cons:
- ❌ Shorter hem length than taller hikers may prefer
- ❌ Fewer premium pocket and venting features than flagship Columbia models
Look for the Columbia Bugaboo II Interchange in the C$140-C$210 range, which makes it one of the strongest value plays in this entire roundup.
6. CAMEL CROWN 3-in-1 — best for hikers on a tight starting budget
Not everyone needs, or can justify, a C$300 jacket for a handful of weekend hikes a year, and that is exactly the gap the CAMEL CROWN 3-in-1 fills. Listings for this jacket state a 10,000mm/H2O waterproof index, a figure that on paper matches or beats several jackets costing three times as much — though it is worth hedging here honestly: at this price point, independent lab verification of that exact figure is harder to confirm than it is for established outdoor brands, so treat it as a manufacturer-stated spec rather than a third-party-tested one. What the spec sheet won’t tell you, but aggregated buyer feedback suggests, is that the fleece liner runs a bit thinner than the shell’s waterproof number implies, meaning this jacket performs better as a three-season rain-and-wind system than as genuine deep-winter insulation. For a first hiking jacket, a loaner for visiting family, or a spare kept in the trunk for unexpected weather, it is a sensible, low-risk entry point into the category.
Pros:
- ✅ Stated 10,000mm/H2O waterproof index at an entry-level price
- ✅ Detachable, adjustable storm hood adds real wind protection
- ✅ Lightweight enough to stuff into a daypack as a backup shell
Cons:
- ❌ Fleece liner insulation is noticeably thinner than premium competitors
- ❌ Construction and zippers feel less durable under heavy repeat use
The CAMEL CROWN 3-in-1 is typically available under C$110, making it the most accessible entry point in this whole lineup by a wide margin.
7. Wantdo Mountain 3-in-1 — best lesser-known alternative for backup or loaner duty
Rounding out the list is the Wantdo Mountain 3-in-1, a jacket that rarely gets mentioned in mainstream gear roundups but has quietly built a loyal following through consistent listings and a stated 10,000mm waterproof rating using a PU membrane shell. The outer layer includes an adjustable hem, snow skirt, and elastic cuffs — features more commonly found on pricier alpine jackets — while the thermal fleece liner zips in for full-system warmth. Honest analysis here has to acknowledge the trade-off plainly: this is not a jacket built by a company with decades of textile-engineering history, so long-term durability data simply is not as deep as it is for Columbia or Marmot. That said, for buyers who want a genuine backup jacket to keep in the car, a loaner for out-of-town guests joining a day hike, or a low-stakes way to test whether the 3-in-1 format suits their hiking habits before investing in a premium option, it is a reasonable, honestly-priced choice.
Pros:
- ✅ Stated 10,000mm waterproof PU membrane shell
- ✅ Snow skirt and elastic cuffs are unusual features at this price
- ✅ Low financial risk for testing the 3-in-1 format before upgrading
Cons:
- ❌ Limited long-term durability track record compared to established brands
- ❌ Sizing runs inconsistent across colourways, per buyer reports
Pricing for the Wantdo Mountain 3-in-1 generally sits under C$140, positioning it alongside the CAMEL CROWN 3-in-1 as one of the two true budget options in this roundup.
Building Your Hiking Layering System Around a 3-in-1 Jacket
A hiking layering system only works if each piece has one job and does it well, and a 3-in-1 jacket is best understood as two of those jobs bundled into one purchase rather than a magic single solution. Here is how to actually set one up for the trail rather than just for looking good in a parking lot.
Start by treating the shell and liner as genuinely separate tools, even though they zip together. Before a hike, check the forecast for both temperature and precipitation independently — a cold, dry day calls for the fleece liner plus a light base layer underneath, while a mild, wet day calls for the shell alone over a wicking layer, since trapping the fleece under a waterproof outer in warm rain is a fast route to overheating and sweat-soaked cotton-equivalent misery. The classic mistake in the first thirty days of ownership is wearing the full zipped-together system on every outing regardless of conditions, which defeats the entire purpose of buying a modular jacket in the first place.
Maintenance matters more than most buyers expect. DWR (durable water repellent) coatings on the outer shell degrade with dirt, body oil, and repeated washing, so a shell that “isn’t waterproof anymore” after a season is often just due for a proper technical wash and a low-heat tumble dry to reactivate the coating — never use regular detergent or fabric softener, both of which coat the fabric and block the DWR from working. A yearly reproofing spray extends shell life noticeably, and it is far cheaper than replacing the whole jacket. On the fleece side, zip it in and out gently rather than yanking, since the interchange zippers are usually the first failure point on budget models.
One optimization trick most product pages will not mention: pack the fleece liner separately in your daypack rather than always wearing it zipped in, even on cold mornings. Trailheads are almost always colder than the trail an hour into a climb, so starting in just the shell (slightly chilly, per Parks Canada’s own advice above) and adding the fleece at a summit or rest stop avoids the sweat-then-freeze cycle that catches out so many winter hikers. The Canadian government’s own cold-weather safety guidance makes the same point for outdoor workers: proper layering, not just heavier layering, is what actually prevents cold-related injury.
Ready to build out the rest of your winter kit? Browse current listings and lock in your pick before the next cold snap. ⛰️
Real-World Scenarios: Matching the Jacket to Your Hike
Picture three different hikers standing at the same trailhead, and you will see exactly why one “best” jacket does not exist.
The first is a weekend warrior in her early thirties, hiking Ontario conservation trails every second Saturday with a moderate budget and no interest in obsessing over gram counts. For her, the North Face Antora Triclimate or Columbia Bugaboo II Interchange makes the most sense — enough performance to handle unpredictable shoulder-season weather, without paying a premium for features she will rarely push to their limits.
The second is a retired schoolteacher in Squamish, British Columbia, hiking near-daily through a climate defined by persistent drizzle and coastal humidity. Budget is less of a constraint than reliability, and here the Helly Hansen Squamish CIS earns its literal namesake, with PrimaLoft insulation that shrugs off dampness in a way cheaper fleece liners simply cannot match. Frequency of use this high justifies the investment; a jacket worn four times a week needs to survive hundreds of wet-dry cycles a year.
The third is a university student in Alberta on a tight budget, hiking a handful of times per season and needing gear that will not become a financial regret if his interest in the hobby fades. The CAMEL CROWN 3-in-1 or Wantdo Mountain 3-in-1 covers exactly this use case — low-stakes, genuinely functional, and easy to replace or upgrade later without feeling like wasted money. As one popular Vancouver-based outdoors blog puts it when discussing winter hiking layering strategy, the goal is dressing for the terrain and climate you actually face, not the terrain in a catalogue photo — and that principle applies just as much to budget as it does to fabric technology.
Common Problems (and Fixes) With 3-in-1 Jackets on the Trail
Even a well-built 3-in-1 jacket for hiking runs into a handful of predictable snags. Here is how to solve the most common ones.
Problem: The zipped-in liner bunches or twists uncomfortably under a backpack. This usually comes down to zipping the interchange system together before putting the jacket on rather than after, which lets both layers settle naturally against your body. Zip the liner into the shell while the jacket is laid flat, then put it on as one piece.
Problem: Condensation builds up inside the shell during aerobic climbs. This is a breathability limit, not a leak, and it happens most with lower-tier DryVent or PU-membrane shells like those on the Wantdo Mountain 3-in-1 or budget Columbia models. Open pit zips or venting well before you start sweating heavily, rather than after, since breathable membranes work far better at managing moisture already in transit than moisture already condensed against your skin.
Problem: The DWR coating seems to “stop working” after a season. As covered above, this is almost always a cleaning issue rather than a defect — a proper technical wash and reproofing spray typically restores beading performance on the Columbia Whirlibird IV Interchange, Marmot Ramble Component, and similar shells.
Problem: The jacket feels too warm zipped together except on the coldest days. This is a sign you are overusing the full system. Reserve the zipped-together configuration for genuinely cold conditions and default to the shell or liner alone otherwise — most 3-in-1 owners actually wear the combined configuration far less often than they expect when they first buy it.
Problem: Sizing runs inconsistent, especially on budget imports. Order a size up on models like the CAMEL CROWN 3-in-1, since the liner adds bulk that many size charts do not fully account for, and confirm the retailer’s return policy before purchasing.
How to Choose a 3-in-1 Jacket for Hiking
Choosing the right 3-in-1 jacket for hiking comes down to matching seven concrete criteria against how, where, and how often you actually hike.
- Match the waterproof rating to your climate. Coastal and mountain hikers should look for 10,000mm or higher; drier interior climates can get away with less.
- Check the insulation type, not just the weight. Synthetic fill like PrimaLoft or Thermarator keeps insulating when damp; down does not, and most 3-in-1 liners use synthetic fill for exactly this reason.
- Confirm the shell is seam-sealed, not just DWR-coated. Unsealed seams are the number-one cause of “waterproof” jackets that leak.
- Consider your typical hike length and intensity. Longer, more aerobic hikes benefit from higher breathability ratings, even at the cost of a slightly lower waterproof number.
- Try the liner on alone before buying. A liner that only fits well when zipped into the shell will feel restrictive worn solo on milder days.
- Weigh pocket and hood adjustability. One-hand hood cinches and zippered chest pockets matter far more on an actual trail than they seem to on a store rack.
- Set a realistic budget based on frequency of use. A jacket worn weekly justifies a bigger investment than one worn a handful of times per season.

Men’s 3-in-1 Jacket vs a Separate Shell-and-Fleece Combo
The men’s 3-in-1 jacket category exists because it solves a genuine logistics problem, but it is worth being honest about where a separate, mix-and-match shell-and-fleece combo still wins.
| Factor | 3-in-1 Jacket | Separate Shell + Fleece |
|---|---|---|
| Upfront cost | One purchase, moderate | Two purchases, often higher total |
| Fit precision | Compromise fit for both pieces | Each piece sized independently |
| Packability | Bulkier when carrying both | Lighter if only carrying one piece |
| Best For | Convenience, budget, simplicity | Technical hikers who layer precisely |
The table above tells a fairly clear story: a men’s 3-in-1 jacket wins on convenience and total cost, since buying one coordinated system is almost always cheaper than sourcing a dedicated hardshell and a separate technical fleece from two different product lines. Where the separate approach pulls ahead is fit precision — a standalone shell can be sized for layering room while a standalone fleece fits snug against the skin, something the compromise fit of an interchange system cannot always achieve. For most hikers doing day trips and moderate winter outings, the convenience of a 3-in-1 outweighs the marginal fit gains of going separate, but hikers pushing into genuinely technical alpine terrain often do eventually graduate to a dedicated hardshell paired with a purpose-built mid-layer.
Breathable Hardshell Fabric: What the Numbers Actually Mean
Breathable hardshell fabric is measured almost as often by its breathability rating as its waterproof rating, and the two numbers work in tension with each other — more waterproofing generally means a denser membrane, which tends to reduce how much moisture vapour can escape. The North Face Antora Triclimate‘s DryVent 2L construction, for instance, prioritizes waterproofing and durability over top-tier breathability, which is exactly why it performs better on casual walks than on aggressive uphill efforts where sweat needs somewhere to go.
Here is what most spec sheets do not spell out clearly: a breathable hardshell fabric rated in grams per square metre per 24 hours (g/m²/24h) tells you how much water vapour theoretically passes through the fabric in ideal lab conditions, not real trail conditions with sweat, wind, and body heat all interacting at once. Reviewers consistently note that even highly rated breathable hardshell fabric feels clammy during sustained climbing effort, which is less a flaw in the fabric and more a reminder that venting zips, pace management, and layering choices matter just as much as the textile science. If your hikes involve serious elevation gain, prioritize a shell with underarm vents — like the Columbia Whirlibird IV Interchange‘s venting zippers — over chasing the highest breathability number on a spec sheet alone.
Waterproof Rating for Trail Wear: How Much Do You Actually Need
The waterproof rating for trail wear question comes up constantly, and the honest answer is: it depends heavily on how wet, and for how long, your typical hike gets. Waterproof performance is measured using a hydrostatic head test, where a fabric sample is loaded with a rising column of water until it begins to seep through, with the result expressed in millimetres. A 5,000mm rating handles light, intermittent rain reasonably well; a 10,000mm rating, found on the Marmot Ramble Component, CAMEL CROWN 3-in-1, and Wantdo Mountain 3-in-1 in this roundup, handles sustained moderate rain with real confidence.
| Waterproof Rating | Real-World Performance | Best Climate Match |
|---|---|---|
| Under 5,000mm | Light drizzle only | Dry interior regions |
| 5,000-10,000mm | Moderate, sustained rain | Most of Canada, general use |
| Over 10,000mm | Heavy, prolonged downpours | Coastal BC, alpine environments |
Reading the table above, most Canadian hikers do not actually need the highest waterproof rating for trail wear available on the market — anything in the 5,000mm to 10,000mm band comfortably handles the bulk of weather most trails throw at you outside of a genuine coastal storm. Where a higher number earns its keep is specifically in British Columbia’s coastal ranges and any hike where you might be caught out for hours rather than minutes, since sustained exposure is what eventually overwhelms a lower-rated shell’s seams and zippers, not a single passing shower.
Common Mistakes When Buying a 3-in-1 Hiking Jacket
The single biggest mistake buyers make is choosing based on brand recognition alone rather than checking whether the specific model has a published waterproof rating and seam-sealing confirmation — plenty of jackets marketed as “waterproof” rely on DWR coating alone with unsealed seams, which fails quickly in sustained rain regardless of how trusted the logo is.
A second common error is buying a size based on the shell alone and forgetting that the liner adds meaningful bulk once zipped in; try the full system together, not just the outer shell, before finalizing a size. Third, many first-time buyers overlook hood adjustability entirely, assuming all hoods perform the same, when in practice a poorly adjustable hood becomes a genuine safety issue in wind-driven rain by restricting peripheral vision. Fourth, buyers frequently skip checking pocket placement against backpack hip-belt height, only to discover their favourite jacket’s hand pockets are useless once a pack is loaded. Finally, plenty of buyers assume a higher price automatically means better performance for their specific climate — as the comparison tables above show, a hiker in a dry interior region gains little from paying for coastal-grade waterproofing they will rarely need.
Long-Term Cost & Maintenance: Getting Years Out of Your Jacket
Thinking in total cost of ownership rather than sticker price changes the calculus on which jacket actually represents the better value. A budget option like the CAMEL CROWN 3-in-1, priced under C$110, might need replacing within two or three seasons of regular use if zippers or seam tape begin to fail, while a Marmot Ramble Component or Columbia Whirlibird IV Interchange, though pricier upfront, can reasonably last five to eight years with proper DWR maintenance — which, on a cost-per-season basis, often narrows or even closes the price gap.
| Tier | Upfront Cost | Expected Lifespan | Cost-Per-Season Estimate |
|---|---|---|---|
| Budget (CAMEL CROWN, Wantdo) | Under C$140 | 2-3 seasons | Lower entry, higher long-term cost |
| Mid-range (Antora Triclimate, Bugaboo II) | C$140-C$290 | 4-6 seasons | Balanced value |
| Premium (Whirlibird IV, Ramble Component, Squamish CIS) | C$240-C$360 | 5-8+ seasons | Best long-term value with care |
The pattern in that table holds up across most outdoor gear categories, not just jackets: premium builds from established brands like Marmot and Helly Hansen tend to amortize their higher upfront cost over a longer usable lifespan, provided you actually maintain the DWR coating annually and store the jacket properly (dry, loosely hung, away from direct heat) rather than balled up damp in a gear bag. Buyers who hike only a handful of times per year, however, will likely never reach the point where a premium jacket’s durability advantage outweighs its higher initial cost, which circles back to matching the jacket tier to genuine frequency of use rather than aspirational hiking plans.
Frequently Asked Questions
❓ What waterproof rating do I need for a 3-in-1 jacket for hiking in Canada?
❓ Can I wear the fleece liner from a men's 3-in-1 jacket on its own?
❓ How long does a breathable hardshell fabric shell actually stay waterproof?
❓ Is a 3-in-1 jacket warm enough for a Canadian winter on its own?
❓ What is the difference between a hiking layering system and just wearing a 3-in-1 jacket?
Conclusion
Choosing the right 3-in-1 jacket for hiking really comes down to being honest with yourself about how often you hike, in what conditions, and what you are actually willing to spend on outerwear that might spend half the year in a closet. The Marmot Ramble Component and Helly Hansen Squamish CIS reward hikers who log serious miles in genuinely wet or technical terrain, while the Columbia Whirlibird IV Interchange and North Face Antora Triclimate hit the sweet spot most Canadian day hikers actually need. If budget is the deciding factor, the Columbia Bugaboo II Interchange delivers real Columbia technology without the flagship price tag, and the CAMEL CROWN 3-in-1 or Wantdo Mountain 3-in-1 offer a low-risk way to test whether this category suits your hiking habits before investing further.
Whichever you choose, remember that a jacket is only as good as its maintenance — a properly cared-for shell will keep beading water long after a neglected one has started soaking through. Match the waterproof rating for trail wear to your actual climate, build your hiking layering system around the jacket rather than expecting it to do everything alone, and you will get years of reliable performance out of whichever pick ends up in your pack.
✨ Don’t Miss These Exclusive Deals! 🥾
Check current prices on today’s top picks before the next cold front rolls in, and gear up with confidence for whatever the trail throws at you this season!
Recommended for You
- All-Season 3-in-1 Jacket: 7 Best Picks That Work In 2026
- Interchange Jacket For Canadian Winters: 7 Best Picks For 2026
- Convertible 3-in-1 Jacket vs Separate Layers: 7 Best Picks (2026)
Disclaimer: This article contains affiliate links. As an Amazon Associate, I earn from qualifying purchases. If you purchase products through these links, we may earn a small commission at no additional cost to you.
✨ Found this helpful? Share it with your friends! 💬🤗
